Trello Editorial Calendar: the Super Simple Way to Plan Your Blog Posts
I think I have used everything under the sun to keep track of my blog content creation; paper planners, post-it notes, spreadsheets, etc. But the best way I’ve found is creating a Trello Editorial Calendar.
Blogging is awesome (and I wouldn’t be able to be a stay at home mom without it) but we can probably all agree that it can be totally overwhelming with all. the. things.
I’ve found that a combination of paper planners, a spreadsheet, and Trello helps me stay organized with absolutely everything blog related.
What helps me the most, is when I’m able to steal 15 or 20 minutes here or there (#momlife, right?), and I can just open up my Trello Blog Editorial Calendar board and know exactly what I should be working on.
Trello. It’s going to be your BFF content calendar template in 2019, I pinky-swear!
1 Setup your Blog Editorial Calendar in Trello
TRELLO BOARD
First, you’ll want to open a Trello account if you don’t have one (don’t worry, it’s free!) and create a new board. If you’d rather just swipe our Blog Editorial Calendar template, you can grab it here in the Ultimate List of Trello Boards (along with 99 other ideas for moms!).
LISTS
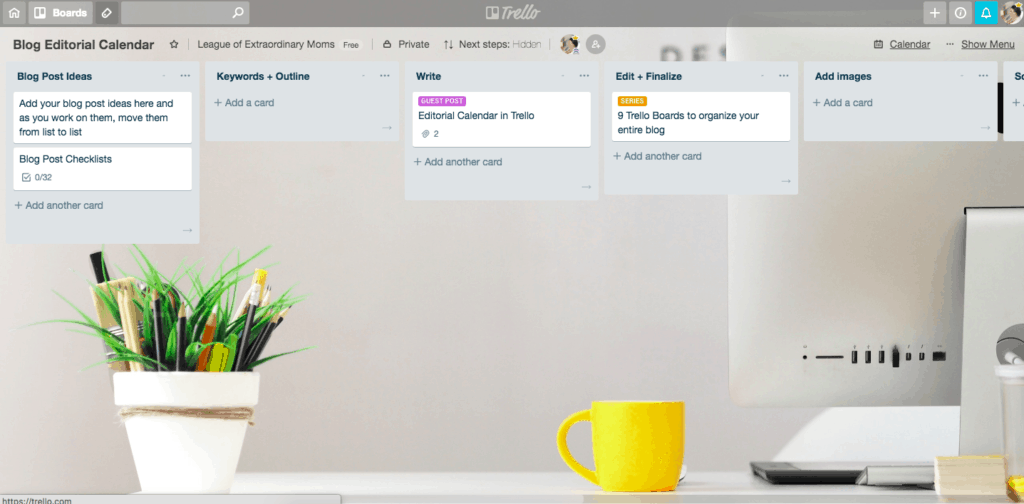
Next, you’ll add a list for each “stage” of your workflow.
CARDS
Each blog post gets its’ own card and then as you move from idea to published, you’ll move that card from list to list.

2 How to Create an Editorial Calendar in Trello
Now that you’ve created your content board, you’ll need a list for each of these:
Blog Post Ideas
This is where you’ll do a massive brain dump. We start our brainstorming with the blog categories, do a little keyword research, and then jot down every single blog post idea. All ideas go on here, you can edit them later!
Keywords + Outline
Once you’ve decided on what will be your next few blog posts to write, assign them a date and move them to this list. This is your “work on next” list.
(PS. Batching your work at this stage is the the best – we talk more about that below!)
Write
All the posts that have been outlined will move here while you’re writing them. If you use Google Docs to write your post, you can even link it right here!
Edit + Finalize
After the rough drafts are finished, move them here so that you’re editing and finalizing the format all at the same time. This is when you’ll walk through the post with fresh eyes to edit, decide on your final title, and choose some titles for your Pinterest pins.
Add images
The last step before scheduling or publishing your blog post is to create all the different sized images you need. You can even add the thumbnail to the card as an attachment and see it as the card cover. Your posts are now ready to be scheduled!
Scheduled
Once you’ve scheduled your posts, put them here until their publishing date and then move them to the Social Media list. Add the url link to the post as an attachment (even though it won’t work yet, you’ll need to it later!)
Social Media
Your promotion could just be on the checklist, but I like to keep it a separate list because you can later add automations to automatically copy that Blog Post card to your Social Media Promotion board.
Published
Here is where you’ll have a running database of all your posts! If you’ve added the post link to the card already, you can easily refer to it on your phone and you need to grab a link. I can’t tell you how many times we’ve had to use this handy feature!
3 Using your Trello Content Calendar to it’s max
CARD FEATURES THAT MAKE YOUR LIFE EASIER
Due Dates
Add the date you want to publish this blog post. We’ll look at it on a calendar view a little later.
Labels
I think labels might just be the best feature of Trello! We set up our labels to show blog category, whether it’s in a series, what kind of post it is, and if it’s “up next” to work on.
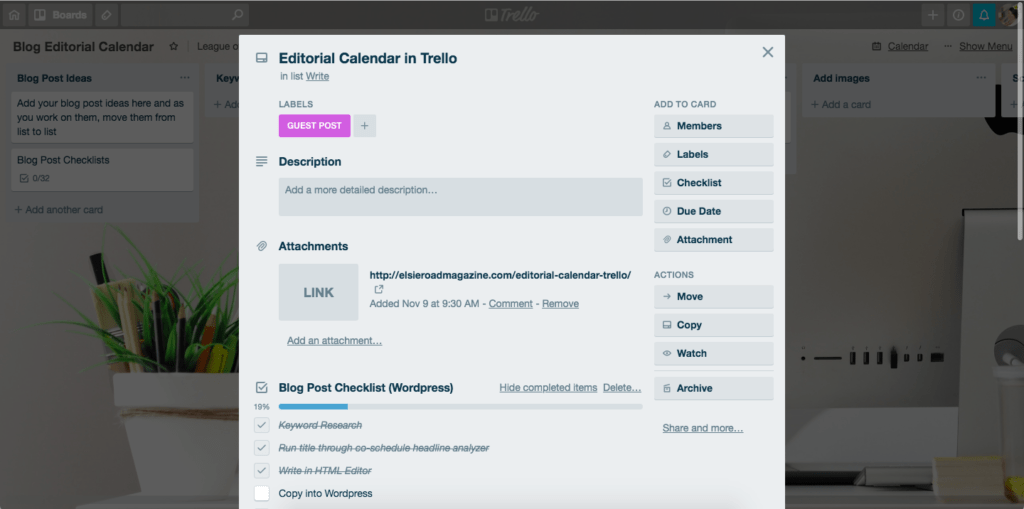
Checklists
You can set up multiple checklists on a card, and you can even copy them from card to card. That’s why I keep the card labeled Blog Post Checklists as my very first card in the Blog Post Ideas list.
Attachments
You can attach a url, an image, or a file from Google Drive or Dropbox to a card. And you can even link another Trello card or board which is nice when you are linking your blog work all together.
KEEP YOUR BOARD AS SIMPLE AS POSSIBLE
There’s nothing worse than creating a system that is too complicated or cumbersome and then you get overwhelmed and give up on it. Sure, Trello can do all kinds of things and be linked to a bazillion other platforms, but if you keep it simple, you’ll have a workflow you actually use over and over again.
BATCH YOUR WORK
When I tell you that batching the content creation process has been the best addition to our time-management schedule we ever did, I’m not exaggerating!
Yes, it will save you boat loads of time to focus on one thing at a time.
But my favorite part is how easily you can write pin descriptions, newsletter blurbs, or Instagram captions while you’re finishing up the blog post. This way, when you need a link or a pin description later, it’s already done!
Sync your new Trello Editorial Calendar to Google
Ohhhh this is my favorite part! Once you’ve assigned a due date to each card, you’ll be able to see them on the calendar and then drag and drop!
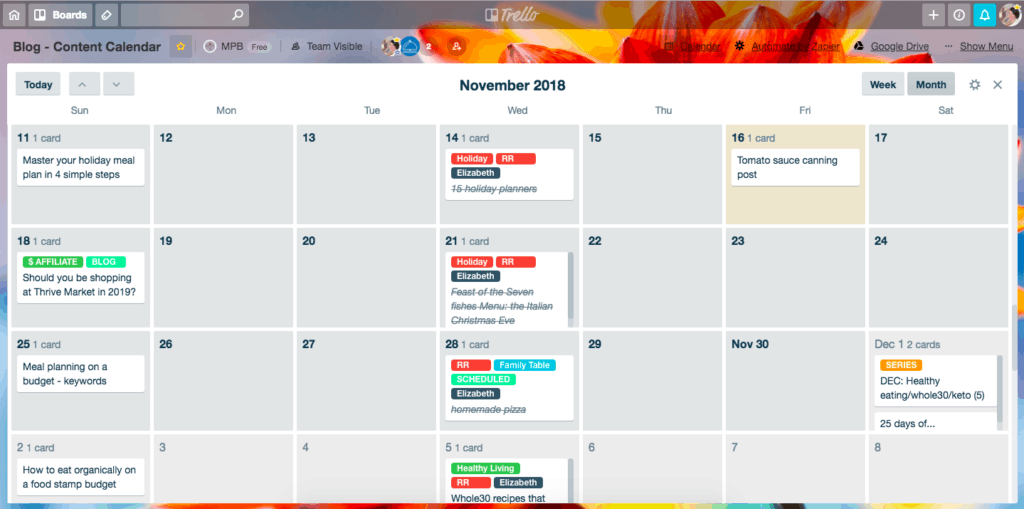
Trello boards don’t automatically come with a calendar, but it’s very easy to enable it so you can see your new trello content calendar at a glance.
On your board, go to Show Menu > Power-Ups > search for Calendar
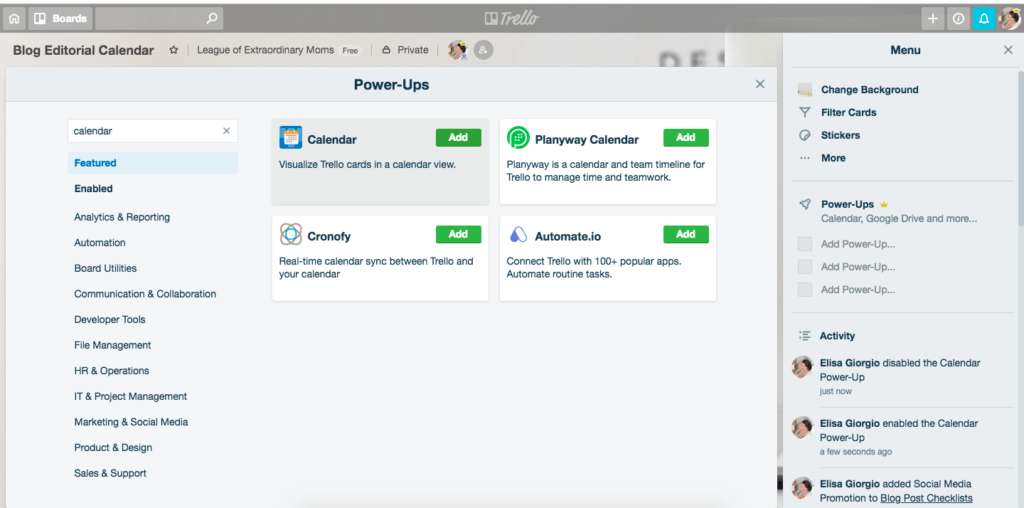
It’s just so satisfying to look at a calendar and see everything you’ll be working on! It also helps because sometimes you’ll notice a post out of order or suddenly come up with a brilliant idea when you see it all together.
There you have it! Your steps to creating the simplest, best blog editorial calendar template ever!
Trello is exactly how Cara and I manage 3 (yes, three!) websites and we hope you found this explanation of how we create and manage our content useful! We both love paper planners and post-its, but we would never be able to (successfully!) organize it all without Trello.
You can swipe our Blog Editorial Calendar template (along with other ideas for mompreneurs!) in the Ultimate List of Trello Boards.
Cara and Elisa from The League of Extraordinary Moms

Cara…
Elisa…
As a blogger, organizer, and expert meal planner, she’s helped thousands of moms learn how to simplify their lives. When she’s not writing or creating courses, to help mamas get organized, you can find her whipping up some spinach artichoke dip, reading at least 3 books at any given time, or explaining why it’s not a good idea to stick markers up your nose – for the eleventy-hundreth time. You can find her over at Meal Planning Blueprints.





Very nicely explained. Thank you so much I will apply it for my parenting blog. Thank you so much.